Skin Creation/zh: Difference between revisions
Appearance
Created page with "'''皮肤'''文件图像采用长宽比为2:1的32位RGBA格式,长和宽的像素个数都必须为 4 的倍数。" |
Updating to match new version of source page |
||
| (18 intermediate revisions by 3 users not shown) | |||
| Line 3: | Line 3: | ||
{{Stub}} | {{Stub}} | ||
<span id="Overview"></span> | |||
== 概述 == | |||
'''''皮肤'''''文件采用长宽比为2:1的32位RGBA格式的图像文件,长和宽的像素个数都必须为 4 的倍数。 | |||
< | <span id="Create_a_skin"></span> | ||
* [https://inkscape.org/ Inkscape] ( | == 制作一个皮肤 == | ||
在开始制作皮肤前请选择合适的软件,为了导出更加清晰的图像与易于编辑,可以使用矢量编辑器。常用的软件如下: | |||
* [https://inkscape.org/ Inkscape] (免费且开源的软件,此教程的选择) | |||
* [https://www.adobe.com/products/illustrator.html Adobe Illustrator] | * [https://www.adobe.com/products/illustrator.html Adobe Illustrator] | ||
* [https://affinity.serif.com/en-us/ Affinity Designer] | * [https://affinity.serif.com/en-us/ Affinity Designer] | ||
现在开始皮肤制作,最容易上手的方式是临摹已有的皮肤或采用模板。在[https://github.com/ddnet/ddnet-data-svg/tree/main/skins GitHub 库]中有许多流行皮肤的svg格式重置版,打开默认皮肤的文件如图所示: | |||
[[File:Default skin svg.png|thumb|default.svg]] | [[File:Default skin svg.png|thumb|default.svg]] | ||
< | [[File:Grid skins clear normal.png|thumb|Skin Template by Cellegen]] | ||
可以看见每个身体部位都有一个对应的黑色阴影。 | |||
</ | |||
阴影代表了Tee的对应部位的轮廓。 | |||
确保每个部位和其阴影的形状一致,而阴影要稍微大一点。 | |||
<span id="Body_Parts_Rendering_order"></span> | |||
==身体部位渲染顺序== | |||
{{todo|确认是否正确}} | |||
# 手部轮廓 | |||
# 手 | |||
# 居后的脚的轮廓 | |||
# 身体轮廓 | |||
# 居前的脚的轮廓 | |||
# 居后的脚 | |||
# 身体 | |||
# 左眼 | |||
# 右眼 | |||
# 居前的脚 | |||
[[Category:Tutorial{{#translation:}}]] | [[Category:Tutorial{{#translation:}}]] | ||
Latest revision as of 08:20, 24 December 2024
概述
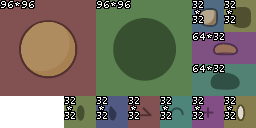
皮肤文件采用长宽比为2:1的32位RGBA格式的图像文件,长和宽的像素个数都必须为 4 的倍数。
制作一个皮肤
在开始制作皮肤前请选择合适的软件,为了导出更加清晰的图像与易于编辑,可以使用矢量编辑器。常用的软件如下:
- Inkscape (免费且开源的软件,此教程的选择)
- Adobe Illustrator
- Affinity Designer
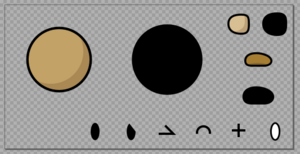
现在开始皮肤制作,最容易上手的方式是临摹已有的皮肤或采用模板。在GitHub 库中有许多流行皮肤的svg格式重置版,打开默认皮肤的文件如图所示:


可以看见每个身体部位都有一个对应的黑色阴影。
阴影代表了Tee的对应部位的轮廓。
确保每个部位和其阴影的形状一致,而阴影要稍微大一点。
身体部位渲染顺序
待办: 确认是否正确
- 手部轮廓
- 手
- 居后的脚的轮廓
- 身体轮廓
- 居前的脚的轮廓
- 居后的脚
- 身体
- 左眼
- 右眼
- 居前的脚
