Skin Creation: Difference between revisions
No edit summary |
Marked this version for translation |
||
| (One intermediate revision by the same user not shown) | |||
| Line 36: | Line 36: | ||
Make sure these share the same shape as each body part, but with a larger stroke size. | Make sure these share the same shape as each body part, but with a larger stroke size. | ||
==Body Parts Rendering order==<!--T:11--> | ==Body Parts Rendering order== <!--T:11--> | ||
<!--T:13--> | |||
{{todo|verify this is correct}} | {{todo|verify this is correct}} | ||
| Line 51: | Line 52: | ||
# Right eye | # Right eye | ||
# Front Feet | # Front Feet | ||
</translate> | </translate> | ||
[[Category:Tutorial{{#translation:}}]] | [[Category:Tutorial{{#translation:}}]] | ||
Latest revision as of 13:56, 5 May 2024
Overview
Skin files are 32-bit RGBA formatted in a 2:1 ratio. Each side of the image must be divisible by 4 pixels.
Create a skin
To create a skin, you'll need the appropriate software before you begin. It's advised to use a vector graphics image editor, as they produce clean exports and are easy to edit. Some popular choices are:
- Inkscape (free, open-source, and the choice of this tutorial)
- Adobe Illustrator
- Affinity Designer
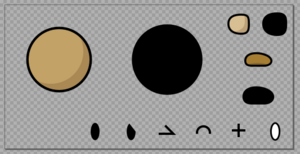
Next, it's time to start making your skin. It's easiest to start from a pre-existing skin, or a template file. This GitHub repo contains many .svg remakes of popular skins. Let's take a look at the default skin .svg:

As we can see, each body part has a corresponding black shadow version.
The black shadow of each body part is the outline used in the tee as a whole.
Make sure these share the same shape as each body part, but with a larger stroke size.
Body Parts Rendering order
- Hand outline
- Hand
- Back feet outline
- Body outline
- Front feet outline
- Back feet
- Body
- Left eye
- Right eye
- Front Feet
