地圖製作
地圖製作過程大致可分為頭腦風暴,貼圖設計以及地圖測試三大環節。Teeworlds所屬的每個模組(遊戲模式)都將遊戲地圖作為玩法的基礎。
頭腦風暴環節要求地圖製作者通過不凡的想像力,來製作出有創意、娛樂性高的地圖實體;
貼圖設計環節要求地圖製作者為地圖添加漂亮的外觀,設計過程中一般要符合大眾審美,且各個貼圖所表示的信息應足夠清晰且不會產生歧義,同時整體設計風格也要一般要符合遊戲畫風;
地圖測試環節要求地圖製作者完整將自己所製作的地圖進行測試,以便發現當前地圖中尚未察覺出的玩法問題或貼圖設計問題等等。
玩家可以點擊主菜單中的編輯器,來進入地圖編輯器界面。
在遊戲內的任何界面下,按下ctrl+⇧ Shift+E也可以直接進入地圖編輯器界面。
DDNet地圖製作準則
如果玩家最終想讓自己的地圖在DDNet伺服器上發佈,那麼玩家必須遵守如下準則去製作地圖。在地圖上傳至DDNet的Discord伺服器之前,請確保玩家已經完整地測試過地圖,地圖各關卡運行和操作流暢,同時設計環節也已完全竣工。
在遊戲體驗方面,我們要求:
每個關卡都應有足夠的空間供玩家進行舒適地操作;
地圖整體難度應保持平衡,不得出現較大的波動(例如在一個中階地圖當中不能插入高星高階地圖甚至是瘋狂地圖的操作);
在容易造成失敗的關卡當中,應有辦法讓其他玩家進行救援;
關卡操作不得過於精確或僅僅為難而難;
不得過度使用特殊遊戲實體,同時不得將特殊實體用在修復地圖關卡漏洞上;
不得故意誤導或混淆關卡操作方式;
關卡不得利用遊戲物理機制上的Bug來實現。
在視覺效果方面,我們要求:
所有玩家過關需要的實體都必須在貼圖當中清晰地表示出來;
不同實體的貼圖或標記必須要易於區分;
前景與背景必須要有明顯的區別;
不要將對比度和飽和度調得太高,否則看上去會很不舒服;
在貼圖層存在標誌,提示或警告時,必須在實體層當中添加「Turn Off Entities(關閉實體層)」的標記;
如果使用了其他地圖當中的素材,則需要得到素材原作者的許可後才能使用。
其他層面上,我們要求:
所有的玩家都必須要經過起點;
每張地圖上都應有時間檢查點。
額外注意:
在上述規則的基礎上,關卡的獨特性和創新性至關重要,同時也要保證地圖有着優秀的貼圖設計。一個簡單但有良好關卡設計和優秀視覺效果的地圖,相比於一個充滿各式各樣複雜問題的地圖來說,會有更高的概率被選中並上傳至DDNet伺服器當中。
編輯器界面總覽
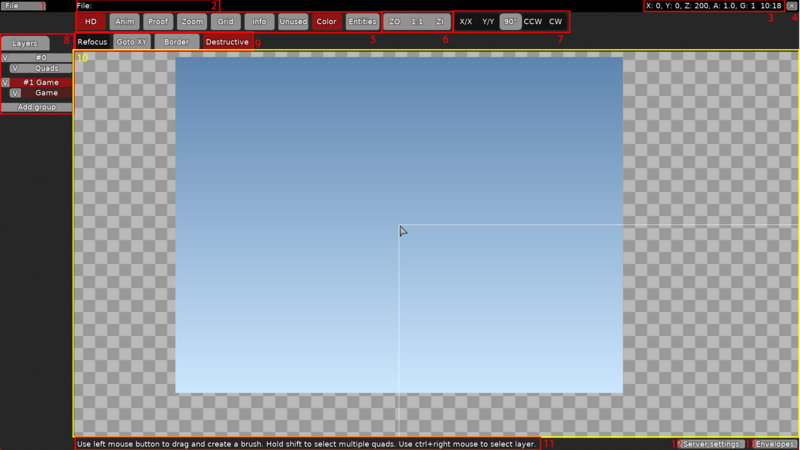
下圖為遊戲自帶的地圖編輯器頁面:
接下來會根據圖片上的內容編號來逐一解釋編輯器界面中各個按鈕的用途。
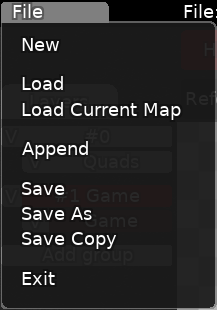
1.文件(File)

點擊後出現的下拉菜單中:
- 新建(New)ctrl+N:新建地圖文件;
- 讀取(Load)ctrl+I:讀取地圖文件;
- 讀取當前地圖(Load Current Map)ctrl+alt+I:若在遊戲過程中或回放中進入了編輯器界面,點擊此按鈕會載入當前遊戲所使用的地圖;
- 添加(Append)ctrl+A:將一個地圖文件里的所有素材添加到當前地圖中;
- 保存(Save)ctrl+S:保存當前地圖;
- 另存為(Save As)ctrl+⇧ Shift+S:以另一文件名保存當前地圖,同時以該文件名繼續編輯地圖;
- 保存副本(Save Copy)ctrl+⇧ Shift+alt+S:以另一文件名保存當前地圖,但以原文件名繼續編輯地圖;
- 當保存副本時所使用的地圖名與現有文件重複時,完成保存後會以該文件名繼續編輯地圖。
- 退出(Exit):退出編輯器界面。
2.文件名
該區域顯示當前讀取的地圖文件名稱以及其文件保存路徑;
3.地圖編輯器的各項屬性
該區域顯示當前地圖編輯器的各項屬性:
- X.Y:表示當前鼠標光標所處於地圖編輯器的位置,單位為網格;
- Z:表示當前地圖的縮放比例值,在編輯器內載入地圖時默認為200;
- A:表示當前地圖動畫的播放倍速,默認為1;
- G:表示當前地圖網格線的尺寸大小,默認為1;
- 10:18:本地時間。
4.退出
退出編輯器界面。快捷鍵ctrl+⇧ Shift+E;
5.功能區
從左到右依次為:
- 展示細節(HD)ctrl+H:預覽當前地圖在高質量模式下的外觀;
- 展示動畫(Anim)ctrl+M:預覽當前地圖所設置的動畫效果;
- 展示視野邊界(Proof)ctrl+P:預覽玩家的最大視野範圍;
- 藍色圓圈表示玩家的實際位置;
- 紅色框線和綠色框線表示在不同解像度下可觀察到的最大範圍;
- 白色框線表示在開啟動態視野後可觀察到的最大範圍。
- 展示遊戲內視覺效果(Zoom):預覽玩家在實際遊戲當中看到的畫面;
- 展示網格(Grid)ctrl+G:開啟網格線;
- 展示信息(Info)ctrl+I:預覽實體或貼圖的詳情信息,內容包括但不限於實體或貼圖所屬ID、貼圖動畫軌跡、貼圖變形情況;
- 放置不可用貼圖(Unused)ctrl+U:允許在地圖中放置不可用的貼圖,現代地圖中已不常用該功能;
- 展示顏色(Color):預覽當前筆刷所設定的顏色,關閉後筆刷將顯示原配色,但不影響放置後貼圖所設定的顏色;
- 實體層選擇(Entitles):選擇當前地圖需要使用的實體層類別,根據地圖所應用到的遊戲模式不同,編輯器中選擇的實體層也應有所不同。
6.視野調整區
從左到右依次為:
- 以點擊按鈕或按快捷鍵的方式擴大或縮放視野無最大和最小比例值的限制,比例值甚至可以達到負值。當比例值為負值時,地圖整體呈顛倒狀態。
- 擴大視野(ZO)numpad-:擴大操作區的視野,每次擴大50點比例值;
- 向下滾動鼠標滾輪同樣可以擴大視野,每滾動一格擴大20點比例值,以此種方式擴大視野最多擴大至2000點比例值。
- 恢復視野(1:1)numpad*:將視野恢復至默認的比例值;
- 縮小視野(ZI)numpad+:縮小操作區的視野,每次縮小50點比例值;
- 向上滾動鼠標滾輪同樣可以縮小視野,每滾動一格縮小20點比例值,以此種方式縮小視野最多縮小至10點比例值。
- 擴大視野(ZO)numpad-:擴大操作區的視野,每次擴大50點比例值;
7.筆刷功能區
從左到右依次為:
- 水平翻轉(X/X)N:將筆刷中的內容水平翻轉;
- 垂直翻轉(Y/Y)M:將筆刷中的內容垂直翻轉;
- 旋轉角度(90°):每次旋轉筆刷中的內容時所轉過的角度,可通過按住該按鈕並左右滑動鼠標來修改,在修改過程中按住⇧ Shift可以更精準地修改;
- 只能從90°、180°、270°三種角度中進行選擇。
- CCW (Counterclockwise rotation) R: rotates the contents of the brush counterclockwise at an angle.
- CW (Clockwise rotation) T: rotates the content in the brush clockwise at a certain angle.
[8] Layers/Images/Sounds management
In this area you can manage different groups of layers including the physics layer. By clicking on the top button "Layers", you can add images and sound resources to the map. Layer management area, here is responsible for managing the map's layer groups and layers, as well as the invocation of the mapping material, picture material, and sound material. Pressing → will also switch to the image management interface, or pressing ← will switch to the sound management interface
Layers
- Layers (left click) →: Switch to Image management
- Layers (right click) ←: Switch to Sound management
- Click "Add group" at the bottom to add a new group.
- Right-click a group to set the parameters of that group
- Right-click a layer to set the parameters of that layer
Images
- Images (left click) →: Switch to Sound management
- Images (right click) ←: Switch to Layer management
- Click the Add button to add image clips from the default clip folder to the map file.
- Embedded area means the clips of this series have been embedded in the map file, when downloading the map, this kind of file will be included in the map file volume.
- External area means that the material of this series is located outside the map, it is the default material in the game, when downloading the map, this kind of file will not be counted in the map file volume. When the map needs to call the image material of this area, it will directly call the file with the same name from the player's local default material library.
- Regardless of the location of the clip, when the clip file is white or red (selected), it means the clip is being used by the map; when the clip file is blue or purple (selected), it means the clip is not yet used by the map.
- Left-click on a file that has been added to preview the image in the right workspace, and right-click on the file to perform the following actions.
- Readd: Overwrite the clip by calling a file with the same name directly from the default clip library.
- Replace: select a clip file to overwrite the clip.
- Remove: removes the clip file.
- When right-clicking on a file in the External area, an additional Embed option will appear to move the file into the Embedded area.
Sounds
- Sounds (left click) →: Switch to Layer management
- Sounds (right click) ←: Switch to Image management
- Click the Add button to add sound clips from the default clip folder to the map file. Currently DDNet game editor only accepts opus format audio files.
- Right-click on a file to perform the following actions.
- Readd: Overwrite a clip by calling a file with the same name directly from the default clip library.
- Replace: select a clip file to overwrite the clip.
- Remove: Remove the clip file.
[9] Context dependent actions
Additional buttons that will change depending on the selected layer.
On all layers
When any layer is selected, the following buttons appear:
- Refocus home: immediately focuses the view to the upper left corner of the map.
- Goto XY: immediately focuses the view to a specific coordinate of the map. Clicking this button sets the coordinate in its drop-down menu, and then clicking the Go button focuses the view to that coordinate.
- Destructive mode ctrl+D: When Destructive mode is enabled, the area the brush passes over will be completely covered and the texture of this area will be replaced; when Destructive mode is disabled, the area the brush passes over will only be filled with the location that is not filled with the texture.
- When Game or Tile layer is selected: Add Border: Adds a two-tile wide border to the current layer, using the texture of the selected layer's No. 2 map.
- When Switch layer is selected: Switch ctrl+A: Set the number of the next placed switch layer entity. In the drop-down menu: Number is used to set the number, Delay is used to set the number of additional information, and F (shortcut: ctrl+F) is used to automatically set the unused number.
- When Speedup layer is selected: Speedup ctrl+A: Set the parameters for the next placement of the speedup entity. In the drop-down menu, Force is used to set how much speed the belt can provide, Max Speed is used to set the maximum speed you can have at the belt, and Angle is used to set the direction of the belt.
- When the Tele layer is selected: Tele ctrl+A: Sets the number of the next entity to be placed in the transmission area. The drop-down menu: Number is used to set the number, and F (shortcut: ctrl+F) is used to automatically set the unused number.
- When Tune layer is selected: Tune ctrl+A: Set the number of the next placed adjustment zone entity. In its drop-down menu, Zone is used to set the number.
- When the Quads layer is selected: Add Quad ctrl+Q: Adds a picture set by the current layer to the workspace. If no picture is set for that layer, a plain white square of 2*2 grid size is added by default.
- When the Sounds layer is selected. Add Sound ctrl+Q: Adds a sound set by the current layer to the workspace.
[10] Mapping area
Workspace, where all the components needed for the map are placed.
[11] Hint area
When the mouse hovers over a button, the hint area will appear with the function of the button and a keyboard shortcut for the button function.
[12] Server setting
You can change Map settings to change server behavior. For example setting a map to be a solo map.
[13] Envelopes
Envelope animation: this is responsible for setting the animation effect in the map.
Explain in detail what is marked "to be explained in detail" above. Full explanation of the features in the editor. Discuss the similarities and differences between modern maps and traditional and classical maps, or discuss their backstories.
Write a short tutorial on mapping.
External Resources
- Mapping ABC by Index
- Link list including lots of mapping resources by Index
- DDRaceNetwork - How to Use the Map Editor by Nick Joy
- Teeworlds - How to map a DDRACE map. - Part 1 by Aoe
- Teeworlds - How to map a DDRACE map. - Part 2 by Aoe
- Maps Envelope Tutorial by 2gethR
- Automapper Tutorial by timakro
- Mapper rules for DDNet map testing process by jao

