Automapper/zh: Difference between revisions
No edit summary |
No edit summary |
||
| Line 8: | Line 8: | ||
==贴图规则文件== | ==贴图规则文件== | ||
贴图资源文件的自动贴图规则通常会写在一个文本文件中,后缀固定为'''.rules''',规则文件名必须和资源文件名相同;每个'''贴图规则'''文件内可以写入多组自动贴图规则。此规则文件大致遵循 [https://en.wikipedia.org/wiki/INI_file INI 文件格式],文件中每组贴图规则以方括号括住规则组的名字为首行,并附带多行具体规则于其后,首行语法为<code>[规则组名]</code>。例如,在文件'''grass_main.rules'''中,有一组名为'''Grass''' 的贴图规则,它在文件中以 <code>[Grass]</code> 开头。要使用这组规则,您需要在地图编辑器中创建一个使用'''grass_main'''文件作为贴图资源的贴图层:首先要新建一个[[Special:MyLanguage/Mapping#Layers 贴图层]](tile layer),然后右键单击此贴图层并选择资源图片(Image)为'''grass_main''',在此图层画好主体部分后,再次打开刚才的右键菜单并点击'''Auto Rule''',然后在下拉选项中选择'''Grass'''规则组,最后点击'''Auto map'''自动贴图。 | |||
自动贴图的文件名'''必须'''和方块集的文件名保持一致。 | 自动贴图的文件名'''必须'''和方块集的文件名保持一致。 | ||
Revision as of 13:32, 8 February 2025
自动贴图是一个方便作者制作地图的工具。只需在贴图层简单地制定一些贴图规则编纂成组运用,就能省去诸如手动在冻结区域边角放置圆角贴图此类的麻烦。每组贴图规则需要指定一个贴图资源文件,但是单个贴图资源文件可以预设多种规则以备选用。所有规则文件位于游戏路径下data/editor/automap/[1][2]
贴图规则文件
贴图资源文件的自动贴图规则通常会写在一个文本文件中,后缀固定为.rules,规则文件名必须和资源文件名相同;每个贴图规则文件内可以写入多组自动贴图规则。此规则文件大致遵循 INI 文件格式,文件中每组贴图规则以方括号括住规则组的名字为首行,并附带多行具体规则于其后,首行语法为[规则组名]。例如,在文件grass_main.rules中,有一组名为Grass 的贴图规则,它在文件中以 [Grass] 开头。要使用这组规则,您需要在地图编辑器中创建一个使用grass_main文件作为贴图资源的贴图层:首先要新建一个Special:MyLanguage/Mapping#Layers 贴图层(tile layer),然后右键单击此贴图层并选择资源图片(Image)为grass_main,在此图层画好主体部分后,再次打开刚才的右键菜单并点击Auto Rule,然后在下拉选项中选择Grass规则组,最后点击Auto map自动贴图。
自动贴图的文件名必须和方块集的文件名保持一致。
Grass 自动贴图[3]:
[Grass]
Index 1

#top
Index 16
Pos 0 -1 EMPTY
...
处理过程
自动贴图会读取规则文件并扫描图层的每个位置。如果所选方块的所有规则都适用,则该方块将被放置在自动贴图扫描的位置。如果多个方块及其规则匹配,则只有最新的规则会生效(因为之前的规则会被覆盖)。除非被禁用,否则自动贴图会将其更改先放入缓冲区,然后再应用。

方块索引
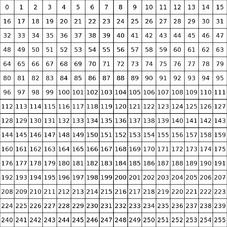
Every tileset has 16 rows and 16 columns and each tile can be addressed by its index. The index of a tile is a direct result of it's position and can be calculated by index = 16 * row + column, where row and column is between 0 and 15. The tile at index 0 is always considered EMPTY. Usually this part doesn't contain textures in tilesets. Each other tile is always considered FULL, even if it doesn't contain any textures and is fully transparent.
The index is used for the INDEX keyword of the automapper.
语法
Naming your automapper-rule:
Similar to ini-files, you can create your own section for your automapper rule:
[your-automapper-rule]
Multiple index selections followed by rules can be part of a section.
Writing a comment:
#this is a comment
Selecting a tile you want to place:
INDEX 42
This selects tile 42 (meaning the 3rd row and 11th column. Multiple indices can be selected by adding an OR between each index:
INDEX 42 OR 43
Modifying the tile:
Index 42 XFLIP YFLIP ROTATE
XFLIP mirrors the tile vertically and YFLIP mirrors the tile horizontally. ROTATE rotates the tile a single time by 90°.
IF you want to rotate a tile by 180°, you only need to set XFLIP and YFLIP but not ROTATE.
If you want to rotate by 270°, you need to set XFLIP, YFLIP and ROTATE.
Tile modifications are always in the same line as the selection.
Rule for placing the tile:
The selected tile gets placed if all following rules apply. A rule for placing the tile always starts with coordinates followed by a rule:
POS 0 -1 FULL
This rule selects the tile with X coordinate 0 and Y coordinate -1 relative to the scanning position of the automapper. If the tile above the scanning position is FULL, the selected tile will be placed (if all following rules apply). If it's EMPTY, it won't be placed.
Instead of using FULL or EMPTY, you can select another tile with the INDEX keyword:
POS 0 -1 INDEX 12
If the tile above the scanning position has index 12, it will be placed. Multiple indices can be selected by adding an OR between each index:
POS 0 -1 INDEX 12 OR 13
Similarly NOTINDEX can be used to exclude a tile.
Random rule:
You can make a selected tile randomly apply to rules by adding a random rule:
RANDOM 20%
The random rule expects a value between 0% and 100%. This value represents the probability, that a tile is placed[4].
If you put a value into it without a % symbol, the probability will not be parsed in terms of percentages, but with this formula:
percentage = 1.0 / value
This allows for rarer tile placements with probabilities between 0% and 1% and a value > 100.
For example RANDOM 150 will have a probability of 1.0 / 150 ≈ 0.67 (percent).
Default condition rule:
By default the game assumes, that you want to apply each rule to a full tile, meaning that the following rule is always implied:
POS 0 0 FULL
You can deactivate this by adding the following line under the tile selection:
NoDefaultRule
NewRun:
Adding NewRun in a section will make the section run an additional time for each time this keyword gets added to the section. This can be used to set some basic tiles in the first run, and more complex ones in the second.
NoLayerCopy:
Adding NoLayerCopy in a section will cause it to run in-place. This can drastically improve performance, because the automapper doesn't copy it's changes into buffer memory before applying it. But it can cause unintended side effects!
工具
Some tools in order to create automapper rules exist:
- SimpleDDNetAutomapper - a small UI application, which tries a more user friendly approach for very basic rules and tilesets. It does not support randomness, or
POS INDEXrules, butEMPTYandFULL. - Teeworlds Web Editor - Automapper edit and live-preview[5].
- rpp - rules++ is a small experiment, aiming to make mappers utterly lazy, by unlocking the full potential of DDNet's rules. It is meant to be simple, readable and most importantly correct, everything else is irrelevant[6].
